Wednesday, November 23, 2011

Week 10 Recap

INTERIOR SKETCHES

One Point Perspective.
This is a one point perspective. That refers to the basic set up of the view.
The rules for the set up: All lines are Horizontal, vertical or vanish to the ONE POINT.
That doesn't mean that everything in the view is in one point perspective- just the room itself, and items that are on axis with the set up. Such as the sofa, coffee table etc. 
The door is not in same plane so it is two point. Same with the blades of the fan. In these instances use the horizon line to find vanishing points that make the perspective believable.
The horizon line controls the perspective of the room but since we opened the door and put a window in the back wall we can actually see the horizon in the background. If the window wasn't ther and the door was closed nothing in the room would change. The horizon still controls the vanishing points.

Two point with a lower camera angle (lower elevation for the Horizon line).

Here is a two point with the back corner of the walls acting as a vertical measuring line.
The elevation of the horizon line is 3'. The height of the wall is 10'. look at the difference in
how this room looks. draw it with a horizon line at 6' and see the difference between a child's eye view and an adults.

Wednesday, November 16, 2011

Week 9 Recap

Reflections.

The reflection starts at the point where the object touches the horizontal plane. So the reflection of the building begins where it meets the ground. There is a bit of shoreline in front of the house that prevents us from seeing the entire reflection. Notice the plant in the water at lower left edge of pond- it's reflection starts right where it meets the water. Look at the tree in the background- like the house it's reflection starts where it meets the ground, and is partially obstructed by the amount of land between it and the reflective water.

Look at the difference between the underside of the roof and it's reflection. the reason the reflection shows more of the underside is because the reflection is farther away from the horizon line.

Here is an exercise that illustrates the point. Notice that the planes are all paralell to each other and that we see more of their surface the farther away from the horizon line the plane is.


Three Point Perspective Continued.
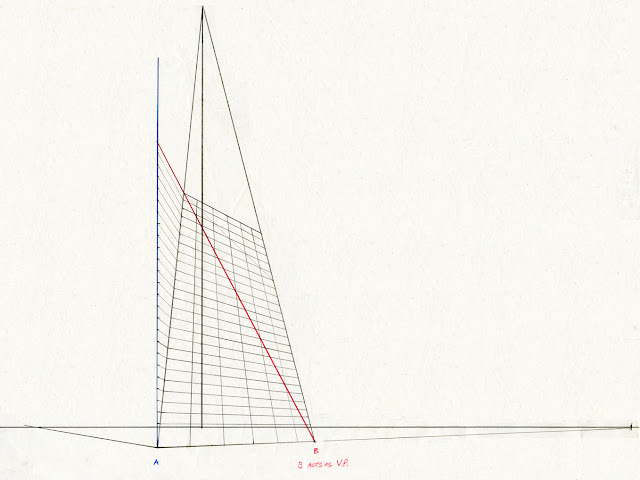
Here is a good method for breaking up the surface of a plane in a three point view.
Once you've drawn a plane in three point perspective draw a vertical measuring line that attaches to the plane (A) then draw a diagonal from the far corner (B) through the upper left corner and meets the vertical (A). This becomes a vertical measuring line- divide it up at an appropriate scale and use point B as v.p. This 'transfers' the divisions on the vertical measuring line onto the tilted plane in the three point perspective. Now use those divisions and the v.p. on the horizon line for the 'horizontal' breakups on the tilted plane.


Wednesday, November 9, 2011

Week 8 Recap

Three point perspective continued.

Remember- in the one point and two point perspectives the viewer's line of sight is straight out to the horizon. In the three point perspective the line of sight has tilted up or down. Lines that represent verticals in the drawing are now vanishing to a third point. either above or below the horizon line, according to the tilt of the line of sight.  Last week we drew a box in three point with the third point below the horizon. This week we drew a view looking up.


And here is another 'box method' sketch. In this case a car.
Using the horizon line to set up a 4'6" high box we establish vanishing points that help us keep all planes in perspective. The car was drawn while keeping in mind the two rough elevation sketches seen above. Adjustments were made as we drew to "make it look right" but the box and the vanishing points acted as references for the perspective of the more curved lines.  This car belongs on the used car lot! Draw your own.


Friday, November 4, 2011

Week 7 Recap

Three Point Perspective


The three point is very similar to the two point except the vertical lines of the drawing now vanish to a third vanishing point that lies on the center line of vision. This is a result of tilting the camera, or our line of sight up or down. The line of sight is no longer aimed at the horizon. In this example we are looking down- if we were looking up the third vanishing point would lie on the center line of vision above the horizon line.

Elements:
• Horizon line
• Center line of vision
• Vanishing points right and left- placed on the horizon line
• Vanishing point 3- placed on the center line of vision
Practise this and expand on the complexity just as we did with boxes in 1 point and 2 point perspective.


Week 6 Recap

Here is a method for dividing an elevation into even or odd spacings that is useful when you don't want to use the diagonals on the face. Importantly, this method makes it easy to divide the plane into odd numbered segments also.


you can use spacing between divisions to have interesting divisions on the face- this is useful for windows on buildings.